Introduction
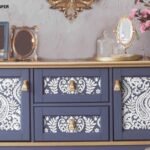
If you love DIY projects, furniture makeovers, or home decor, you may have come across the term “decorative transfer.” But what is a decorative transfer, and how can it elevate your creative projects? Decorative transfers are pre-designed images, patterns, or text that can be applied to various surfaces to enhance their appearance without painting or freehand drawing. They are popular in crafting, furniture refinishing, and interior design due to their easy application and professional-quality results.
In this detailed guide, we will explore everything about decorative transfers, from what they are and how they work to their benefits, types, and application techniques. Whether you’re a beginner or an experienced crafter, this article will provide all the information you need to master decorative transfers and create stunning, one-of-a-kind designs.
What is a Decorative Transfer?
A decorative transfer is a pre-printed design that can be applied to surfaces such as wood, glass, metal, fabric, and walls. These transfers adhere using pressure, water, or heat, depending on the type. Unlike traditional painting or stenciling, decorative transfers allow for intricate designs with minimal effort, making them a favorite among crafters and furniture refinishers.
How Do Decorative Transfers Work?
- They come in sheets with printed designs.
- The user places the transfer on the chosen surface.
- Depending on the type, the design is rubbed, soaked, or heated to attach it.
- Once applied, the transfer blends seamlessly with the surface for a natural, hand-painted effect.
Why Are Decorative Transfers Popular?
- They offer detailed, professional-quality designs.
- Application is fast and easy, even for beginners.
- They can be used on a wide range of surfaces.
- They eliminate the need for freehand painting.
From vintage floral patterns to modern typography and abstract designs, decorative transfers allow anyone to create beautiful, customized decor without requiring advanced artistic skills.
Types of Decorative Transfers
Decorative transfers come in different types, each designed for specific surfaces and application methods. Choosing the right one depends on the project and the material you’re working with.
A. Rub-On Transfers
Rub-on transfers are the most common and widely used type. They consist of a thin plastic film with a design printed on it. To apply:
- Position the transfer on the surface.
- Use a transfer stick or burnishing tool to rub the design.
- Slowly peel off the backing to reveal the applied design.
✅ Best For: Wood furniture, metal, plastic, and glass.
✅ Pros: Easy to use, no water or heat required.
B. Water Slide Transfers
Water slide transfers are printed on a special water-activated paper. To apply:
- Cut out the design and soak it in water.
- Slide the backing off while placing the design on the surface.
- Smooth out any bubbles and allow it to dry.
✅ Best For: Ceramic, glass, and smooth painted surfaces.
✅ Pros: Produces a delicate, hand-painted effect.
C. Heat Transfers
Heat transfers use heat and pressure to adhere the design permanently. This method is commonly used for fabric-based projects. To apply:
- Place the transfer face-down on the fabric.
- Use an iron or heat press to apply pressure.
- Peel off the paper backing to reveal the design.
✅ Best For: Fabric, T-shirts, and canvas.
✅ Pros: Long-lasting, withstands washing.
Each type of transfer has unique advantages, allowing you to customize furniture, home decor, and personal accessories with ease.
How to Apply Decorative Transfers: A Step-by-Step Guide
Applying decorative transfers is simple, but following the right steps ensures a flawless finish.
Step 1: Prepare the Surface
- Clean the surface to remove dust and grease.
- Ensure it is smooth and dry before application.
- If using wood, consider applying a light coat of paint or sealant.
Step 2: Cut and Position the Transfer
- Trim around the design for precise placement.
- Use painter’s tape to hold it in place before starting.
Step 3: Apply the Transfer
- For rub-on transfers: Use a burnishing tool to rub the entire design.
- For water slide transfers: Soak, slide, and press down carefully.
- For heat transfers: Apply heat using an iron or heat press.
Step 4: Seal the Design (Optional)
- To protect the design, apply a clear topcoat (especially for furniture and outdoor projects).
- For fabric transfers, heat-set the design by ironing over it.
By following these steps, you can ensure that your decorative transfer stays vibrant and long-lasting.
Benefits of Using Decorative Transfers
Decorative transfers offer numerous advantages over hand-painting or stenciling, making them a preferred choice for both DIY enthusiasts and professionals.
A. Easy to Use
Even beginners can create stunning designs without artistic experience.
B. Time-Saving
Transfers eliminate the need for sketching, tracing, or intricate painting, reducing project time.
C. Cost-Effective
They provide a budget-friendly way to update furniture and decor without buying new items.
D. Versatile
From walls and furniture to clothing and accessories, decorative transfers work on multiple surfaces.
These benefits make decorative transfers an ideal choice for home renovation, upcycling old furniture, and personalizing gifts.
Comparison Chart: Decorative Transfers vs. Other Design Methods
| Feature | Decorative Transfers | Hand Painting | Stenciling | Decals |
|---|---|---|---|---|
| Ease of Use | ⭐⭐⭐⭐⭐ | ⭐⭐ | ⭐⭐⭐ | ⭐⭐⭐ |
| Time Required | Short | Long | Medium | Short |
| Durability | High (with sealant) | Medium | Medium | High |
| Customization | High | High | Medium | Low |
| Best For | Furniture, decor | Art pieces | Repetitive designs | Stickers |
As shown, decorative transfers provide an effortless way to achieve detailed, high-quality results without requiring artistic skills.
Conclusion
Decorative transfers are an easy, affordable, and stunning way to upgrade furniture, home decor, and DIY projects. Whether you are looking to restore an old dresser, add personalized art to your walls, or customize fabrics, transfers provide a professional-quality finish with minimal effort.
By choosing the right type of transfer and following proper application steps, you can turn ordinary surfaces into beautiful statement pieces.
So, now that you know what a decorative transfer is, it’s time to explore the endless creative possibilities they offer!
FAQs
Can I use decorative transfers on fabric?
Yes! Heat transfers work best for fabric, ensuring a long-lasting design that withstands washing.
Do I need to seal decorative transfers?
For furniture and home decor, sealing with a clear topcoat or varnish ensures durability and longevity.
Can decorative transfers be removed?
Yes, they can be sanded, scraped, or removed with heat, but they are designed to be permanent unless deliberately removed.
Are decorative transfers better than stencils?
It depends on the project. Transfers are easier and more detailed, while stencils require painting but allow for custom designs.
Can I make my own decorative transfers?
Yes, custom transfers can be created using waterslide paper, printable vinyl, or DIY heat transfer sheets.